English
 Arabic
 French
 Spanish
 Portuguese
 Deutsch
 Turkish
 Dutch
Dutch
 Italiano
 Russian
 Romaian
 Portuguese (Brazil)
 Greek
Greek
Customer Experience and Digital Engagement
Other |
2026-02-17 09:31:58
Sending artwork for embroidery digitizing sounds simple — but one wrong move can cost you
time, money, and a ruined batch of garments. Whether you're a brand owner, promotional
product buyer, or small business placing your first embroidery order, understanding how to
properly prepare and submit your design files makes all the difference.
This guide walks you through everything, from choosing the right file format to communicating
stitch expectations clearly, so your affordable embroidery digitizing services experience runs
smoothly from start to finish.
Why File Quality Determines Your Embroidery Output
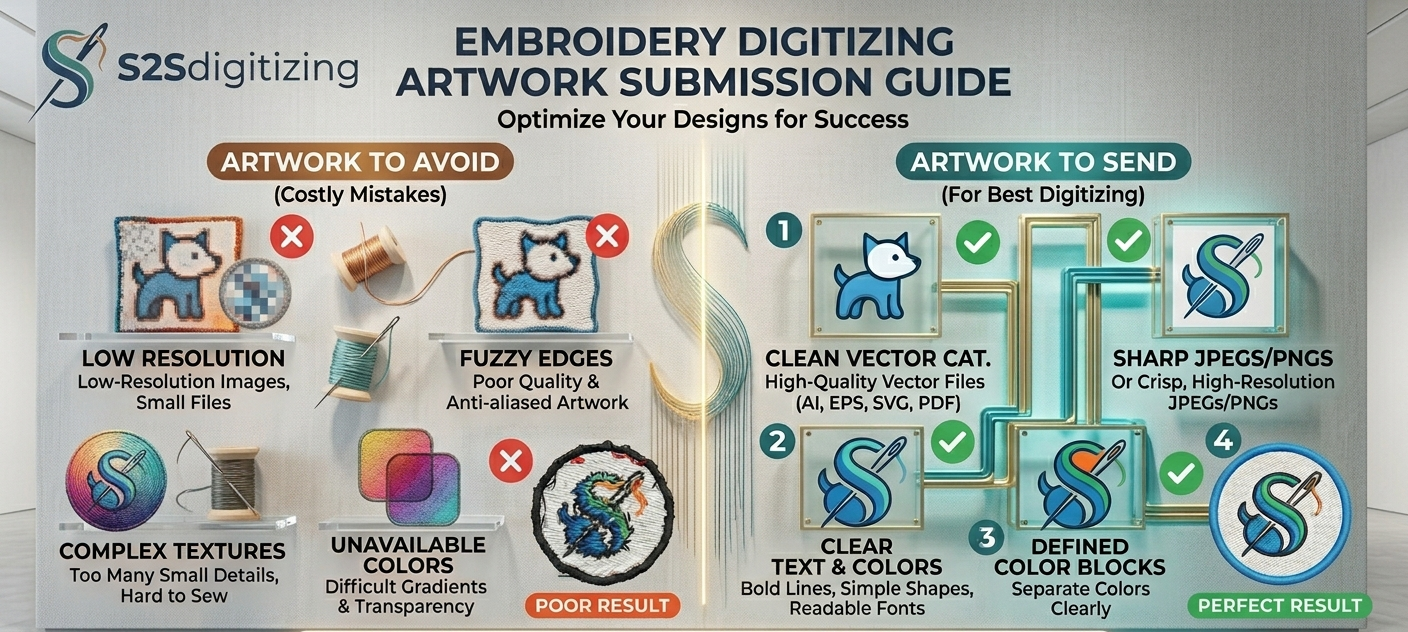
When it comes to the realiable embroidery digitizing, the quality of your submitted artwork
directly impacts the final stitched result. A pixelated logo or low-resolution image forces the
digitizer to guess at fine details, often resulting in distorted lettering, merged shapes, or uneven
stitch density.
Professional online digitizers in the USA work best when they can clearly see every element of
your design; clean edges, defined color separations, and solid contrast. If you're looking for
reliable results, working with a trusted and affordable embroidery digitizing service online that
reviews your file before delivering the final stitch-ready output makes a measurable difference.
Best File Formats to Submit for Embroidery Digitizing
Not all image formats are created equal in the world of machine embroidery. Here’s what works
and what doesn’t:
Recommended formats:
• Vector Files (AI, EPS,SPG,PDF) — These are the gold standard. They’re scalable without
quality loss and give online digitizers precise path data. If your current artwork isn’t in vector
format, a professional vector art conversion service can prepare it before digitizing begins.
• High resolution (PNG or TIFF) — Acceptable if vector isn’t available; minimum 300 DPI at
actual embroidery size.
• PSD (Photoshop files) — Useful when layers are preserved and colors are clearly separated.
Formats to avoid:
• Low-resolution JPEGs (under 150 DPI)
• Screenshots or compressed web images
• Files embedded inside Word documents or PowerPoint slides
Submitting a vector file alone can eliminate back-and-forth revisions and speed up your
turnaround time significantly.
How to Prepare Your Artwork Before Sending
Clean Up Your Design First
Before submitting, review your artwork for unnecessary gradients, drop shadows, or complex
transparency effects. Embroidery thread cannot replicate photographic gradients the way a
printer can. Simplify your design by flattening those effects and ensuring each color zone is
clearly defined. This step alone reduces digitizing errors dramatically.
Specify Your Embroidery Size and Placement
Always include the exact dimensions you want, width and height in inches or millimeters. A
custom logo that looks perfect at 10 inches might lose critical detail when reduced to a 2-inch
chest placement. Mention the garment type too, as stitch count and underlay techniques vary
between knit fabrics, caps, and woven shirts.
Include a Color Reference Sheet
Thread colors in embroidery follow standardized systems like Madeira, Robison-Anton, or
Pantone-to-thread conversion. When you submit your artwork, include either a Pantone color
code or a closest-match thread brand and number. Without this guidance, digitizers make
assumptions that might clash with your brand identity.
Common Mistakes That Lead to Costly Re-Digitizing
Even experienced buyers repeat these errors. Avoid them:
1 Sending a business card scan — Low resolution ruins fine text and hairline details.
2 Assuming all fonts will stitch perfectly — Thin serif fonts often need to be replaced or
bolded for clean embroidery output.
3 Skipping the proof approval step — Always review the digital stitch simulation before the
digitizing file is finalized.
4 Not mentioning the fabric type — Cap digitizing requires a completely different approach
than left-chest jacket embroidery.
5. Requesting too many colors in a small design — Complex color work in tight spaces
creates thread tension issues and longer production times.
What to Include in Your Embroidery Digitizing Services Brief
A strong creative brief eliminates confusion. Your submission should include:
• Final artwork file in the highest quality available
• Desired finished size (width × height)
• Garment or product type
• Thread color references or Pantone codes
• Any specific stitch style preferences (satin, fill, 3D puff)
• Turnaround time expectations
Final Thoughts
Sending artwork for premium embroidery digitizing and vector art service correctly is a skill that
saves money, prevents production delays, and delivers superior stitch quality. By submitting
clean vector files, specifying exact dimensions, referencing thread colors, and reviewing digital
proofs, you position every order for success. Whether you’re digitizing a corporate logo, sports
team crest, or custom patch design, these best practices give your digitizer exactly what they
need to turn your artwork into a flawless embroidered masterpiece.